Hi all! My review is dedicated to another exotic delicacy, only from a local, Russian manufacturer. This is a very unusual dessert! Like the filling of a Bounty chocolate bar, only without the chemicals;) For me personally, the strange thing is that it’s jam...jam made from NUT. I have never tried anything like this before))) But the Romanov Soap Factory brews and sells such deliciousness, and I finally waited my turn for testing: 3 I opened the jar of coconut jam first. 😀 I wanted to gobble it up alone and not share it with anyone.... but I had to treat everyone who was curious!
Direct link to a jar of deliciousness => pysch.
Name: Coconut "Sweet Tooth".
Cost: 270 rubles.
Volume: 0.2 kg
*** Description ***
The jam jar is low, glass. On top of the lid there is a piece of string tied with all the valuable information and an image of that same sweet tooth))) The hedgehog knows a lot about food!)


I unwrapped this jar like candy 😀 It was a very pleasant feeling, I’ll tell you. I love this kind of soulful design!


Each of the four corners of the paper contained information about the product. There were only three components in the composition! And they didn’t take up much space ;)

There was a lid hidden under the paper wrapper. Tightly twisted. The bacteria simply didn't stand a chance, honestly! We, together with the entire male half of our family, tried to open it and hear the treasured “click”. It didn't work right away...

The jam turned out to be fresh, and there was no hint of green “eyebrows” on the lid. And to be honest, I was very afraid that along the way there would be something like that in the jars... I’m lucky with unusual finds in food😀

I managed to receive a parcel with goodies from the Romanov Soap Factory before going to the village, so the photo shoot and tea party took place in the yard on a stump. Beauty! I envy myself)))

*** Consistency, color, taste and aroma ***
The aroma turned out to be quite modest, and that pleased me! Coconut smells very subtle and delicate, there are no fragrances in the composition, where does the bright aroma come from? That's right, out of nowhere. The jam smells exactly like a freshly opened nut. I love this smell!:3
Color: white, with a light beige tint.
But the consistency surprised and made me laugh! For some reason, I imagined pieces of coconut floating in syrup... Well, like canned pineapple in a jar. I thought that cooked coconut would be soft. Well, how could I even come up with this?😀 Everything turned out to be much simpler: these are shavings made from pulp, in the same sugar syrup. The consistency of the jam is thick, but not as dense as the filling in Bounty. It hardens in the refrigerator, like coconut oil, but becomes a little softer at room temperature. I think it will be ideal as a filling for muffins, pancakes, puff pastries and biscuits. Especially in sponge cakes!:3

*** Taste ***
The taste is delicate, nutty, as if it were a freshly chopped coconut, only sweeter! I wouldn’t say that the jam is sugary, but with tea (without sugar) it’s just the same! The shavings are soft, almost melt in your mouth))) As an independent dessert, coconut jam is inferior to the other two flavors from my package, but as a filling for any baked goods it is truly a heavenly delight! It gives a subtle pleasant aroma and an incomparable delicate taste! Even the most ordinary pancakes with coconut become an outlandish delicacy))) For birthday homemade cakes and cupcakes, I will now always buy just such coconut jam; in combination with chocolate dough, the result is a real confectionery masterpiece! Of all the yummy food I had prepared, only pancakes survived to the photo shoot 😀 My parents wouldn’t understand if I stole a dish of goodies from under their noses)))

I highly recommend trying coconut jam from the Romanov Soap Factory “SladkoYozhka” to all coconut lovers and those who like to pamper their family with homemade cakes!
Thank you all for your attention to my review!
- cherries – 500 g;
- granulated sugar – 300 g;
- lemon – 1 slice;
- coconut shavings - 1.5 teaspoons (but more is possible);
- vanillin – 0.5 teaspoon.
1. Wash whole ripe berries in cool water and let it drain; to do this, it is convenient to place the cherries in a colander. 
2. Now carefully remove the pit from each cherry. I did it with a paper clip. By the way, on the page with cherry and mint jam, under the recipe, you can watch a video showing how quickly the seeds are removed. 
To remove pits from cherries, there is also a special device - a pitter. When using it, there is minimal loss of juice from the berries. But if you don’t have such a device, you can use a thin wooden kebabs skewer or a pin.
3. Place the prepared berries in a bowl for making jam. 
4. Fill the cherries with sugar, shake the cup slightly so that it is distributed as evenly as possible between the berries, and leave in this form for 5-6 hours, or even better, do this in the evening and let the cherries and sugar sit all night. 
5. After the required time has passed, carefully mix the juiced cherries with sugar, pour in 2 tablespoons of water and place on low heat. 
6. Bring the mixture to a boil and simmer for 10 minutes, skimming off any foam that forms. Now turn off the heat and let the jam cool completely. 
7. Then put it on fire again. When the cherry jam starts to boil again, add a lemon slice to it, be careful not to get any seeds, also add vanillin and coconut flakes. Mix everything together carefully and cook for 10 minutes. 
Here's the thing about coconut flakes. In the ingredients I wrote 1.5 teaspoons - this is the minimum. I accidentally dumped half a kilo of pitted cherries, about 4-5 tablespoons for sure! I thought I had ruined everything, but as it turned out, it turned out to be very good jam. 
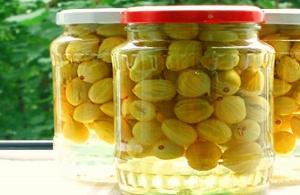
8. Pour the hot jam into dry, clean jars, roll up the lids, wrap it up and leave it like that until it cools completely, and then put it away for storage.

I only got one 450-gram jar of jam, and also an incomplete tablespoon for testing, and my daughter immediately took the jar for morning tea. 

Adviсe:
1. Try to use wide and low dishes for cooking to increase the area of contact between the jam and the air, and also to prevent the berries from being crushed under the weight of their own weight.
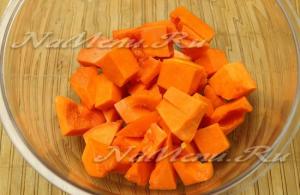
Preservation We are pleased to present you with a step-by-step recipe for preparing the dish “Melon Jam”. It's really worth a try. Melon 500 g. Cardamom 2 pcs. Lemon 1 pc. Sugar 200 g. Star anise 1 pc. Sometimes you buy a melon, but it turns out to be completely tasteless, here’s a way to figure out what to do with it. Peel the melon pulp and cut into cubes. Place melon pulp, sugar, peeled cardamom seeds, star anise, zest and juice of one lemon into an enamel cup. Bring the jam to a boil over low heat, stirring constantly, cook until the sugar is completely dissolved, remove the cup from the heat and leave to cool. The next day, bring the jam to a boil over low heat and simmer for 5-8 minutes. Every other day, bring the jam to a boil again and boil for 5-8 minutes. The jam is ready. If anyone wants to close it for the winter, then when hot, you need to put the jam into sterilized jars, seal it tightly, and store it in a dark place.Rinse in cold running water. Blanch in boiling water for five minutes and drain the water into a saucepan. Make sugar syrup based on it; you need 0.5 liters of water per 1 kg of berries. Heat the water over low heat and gradually add sugar to it, stirring constantly until all the sugar has dissolved. Do not boil. Strain the syrup into an enamel bowl in which the jam will be cooked and, bringing it to a boil, add sea buckthorn berries. You need to cook the jam right away; it is not recommended to let the berries sit out beforehand. During cooking, the foam is constantly removed. Preheat and dry the jam jars and boil the lids. Pour the prepared jam, seal, turn the jar over and cool.
Now I will tell you more about boiled coconuts, since this topic is very, very relevant in Asia. So far it has not yet touched the Philippines, where they still sell only good fresh raw ones, but it has long touched Thailand, Vietnam, Indonesia, Malaysia, Singapore, etc.
Why are coconuts boiled? There are two reasons for this:
1) After cooking, coconuts become very sweet and tasty. Even already overripe, so-called old coconut becomes tasty, very, very pleasant. And not only the coconut water tastes good, but also the pulp.
2) Boiled coconuts can be easily peeled down to the kernel. And such small coconuts (coconut kernels) are convenient to sell, store, transport, etc. I remember that when I first came to Thailand, in 2010, I almost always bought boiled coconuts (out of ignorance!), because they were small and it was very easy for me to carry them in my hand, drinking on the go. And their taste seemed more pleasant to me at that time. But you can’t carry large green coconuts in your hand (your hand will dry out!), you need to stop and drink a whole coconut at once, and their taste is not so rich, you need to get used to it, few people appreciate it the first time.
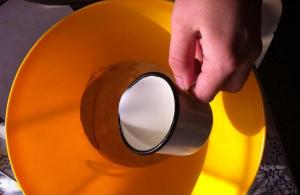
This is what boiled coconuts look like – small, grey-white, smooth. When you first come to Asia and know nothing about coconuts, you will never understand that these delicious babies are boiled... I actually thought that they were just a different type of coconut. That there are big green ones, and then there are these little gray ones. Of course, I was surprised that I had never seen them on palm trees, unlike green coconuts, but I couldn’t even think that they were boiled.
As I already said, boiled coconuts not only have tastier and sweeter juice, but also pulp. It becomes like ice cream! Especially if the coconut is chilled. Insanely delicious.

This is how coconuts are cooked. 
It happens that boiled coconuts are peeled only on top. That’s why they turn out so smooth on top, and just like regular hewn underneath.

Now about coconuts from Tesco Lotus and Big C supermarkets. Probably everyone who has been to the city has noticed that the coconuts in these supermarkets are especially tasty. There is probably no one who would not appreciate Teskov coconuts! Their taste is divine! And they are much tastier than coconuts bought somewhere in markets and small fruit stalls. So, these coconuts are also boiled... Unfortunately. They are boiled in less time than those coconuts, which are then peeled to the very core, but they are also boiled - this is a fact.

On the right are specifically boiled coconuts, on the left are less boiled coconuts, but also boiled, just not for so long. 
The flesh of Teskov coconuts is very easily separated from the kernel. This only happens (!) with boiled coconuts. You will never tear the flesh out of a raw fresh coconut like this.

On the contrary, the pulp in raw coconuts is difficult to separate from the kernel. Feel the difference:

These coconuts took the longest to boil.


Raw coconut and its boiled counterpart.


Sale of boiled coconuts.


Pulp from boiled coconut kernels is easy to obtain.


A Thai man carries boiled coconut kernels in a bucket. Large raw coconuts would not fit into such a bucket... except maybe one or two pieces.

And a few more photos of boiled coconuts to clearly remember what they look like. Especially for those who do not want to drink them boiled, but prefer raw, fresh products.


This is how coconut meat is prepared. Asians generally make something out of coconuts all the time, using absolutely everything in them, without throwing anything away.

Good, fresh, raw coconuts look like this. This is exactly what we buy. The most natural product!


By the way, I didn’t notice that boiled coconuts made me feel unwell. But I don’t like this fact itself... I want to eat the best and freshest foods.
By the way, if you need to buy a backpack for a girl for school, then go to this site. There is a huge selection of backpacks for girls!