Let's prepare all the ingredients that are indicated in the general list and a silicone mold with a diameter of 18 cm. I have a volumetric silicone mold, Eclipse. If you don't have such a mold, you can use a springform pan or a metal ring with a diameter of 18 cm.

First, let's prepare "Cherry confit with cognac." Pre-soak gelatin (6 g) in very cold water (36 g), in a ratio of 1:6. If the water is not cold enough, I replace part of the water with pieces of ice (ice in terms of 100 ml of water is 92 g), this helps preserve the gelling properties of gelatin. Leave to swell for 40-60 minutes (according to the instructions). I have gelatin powder.

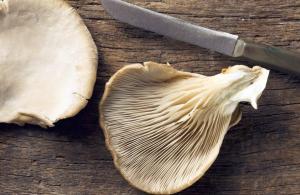
Place sugar (60 g) and frozen pitted cherries (250 g) in a saucepan and heat over medium heat until the sugar dissolves and then boil for another 2 minutes. Punch lightly with a blender so that small pieces of berries remain (they will be pleasant to feel).

Remove from heat, cool to 85°C, add the swollen gelatin, stir well until it is completely dissolved. Add 20 g of cognac and 1 tsp. lemon juice. Along the way, don’t forget to taste it, it turns out very tasty, and the main thing here is to stop in time, you should save it for the cake.)

We bake “Brownies with almonds”. Place melted butter (90 g) and dark chocolate (90 g) into a mixer bowl; if you want to enhance the taste of chocolate, use dark chocolate. I love bitter chocolate, but just dark chocolate is great for this cake. Beat at low speed, adding sugar (90 g).

Preparing "White chocolate mousse". Soak gelatin (10 g) in cold water (60 g), similar to step 1. Let's prepare the chocolate and brownies so we have them ready. Grind white chocolate (85 g), remove the brownie from the refrigerator, cut off the top of the cake layer and cut out a circle with a diameter of 14 cm and a height of 1-1.5 cm. Grind the yolks (36 g, this is from 2 eggs) with sugar (20 g) and 2 tsp vanilla sugar.

Place the mold on a tray and pour out part of the chocolate mousse, a little less than half. Place in the freezer for 3-5 minutes. Place the cherry confit exactly in the center onto the slightly elastic mousse (do not take it out of the freezer in advance). Pour the mousse on top so as to just cover the confit.

Lay out the cut out brownie circle. We also try to place it in the center, and fill the form with the remaining mousse. Lightly submerge the brownies into the mousse and carefully roll the tray with the mold so that there are no voids. That’s it, put it in the freezer for 12 hours or overnight.

Preparing “Mirror Glaze”. Let's start with gelatin (12 g). Soak in ice water (72 g). Well, if you have sheet gelatin, it's easier to work with! Immediately prepare a jug into which we place condensed milk (100 g) downwards, and finely chopped white chocolate (150 g) on top of the condensed milk.

In a saucepan, combine 75 g of water, 150 g of sugar and 150 g of glucose syrup. We begin to heat it, do not stir, do not touch, until the sugar dissolves, you can slightly move the saucepan on the stove, helping the sugar to dissolve. The mixture begins to boil, the sugar has dissolved. Now we need an electronic thermometer. Mix with a spoon (spatula), bring to a temperature of 103°C. Two points are very important: undercooking or overcooking, both give a bad result for the glaze! If you don’t have an electronic thermometer, we use the method that I already suggested in the recipe (see step 21).

Pour the hot syrup into a jug, the chocolate gradually melts, the temperature of the syrup drops to 85°C, add the swollen gelatin. Gelatin can be slightly melted in the microwave and poured into a jug. Gently mix with spatula.

Let's prepare some dye so we have it on hand. We insert the attachment of the immersion blender at an angle to avoid any unwanted bubbles for the glaze, and begin to beat the mixture with pulsating movements until it becomes homogeneous. Add the dye, a few drops, continue to punch through the glaze and watch with interest how the color of the glaze changes. We like her more and more, beauty. Tip: Freeze a white plastic spoon, then dip it into the finished frosting to see what color your cake will be. We hold the blender nozzle at an angle, turning only the jug, a funnel appears into which the bubbles go.

If they are punched without bubbles, great, immediately cover the glaze with cling film in contact, since the glucose syrup forms a film on the glaze. If nasty bubbles form, you need to strain the glaze into another jug through a fine sieve and cover with film. That's it, put it in the refrigerator for 12 hours or overnight so that the glaze matures.
The labor-intensive process of preparing a mousse cake with mirror glaze will take more than a day, but it will be spent waiting for correctly made layer cakes
How to make a mousse cake with mirror glaze?
The labor-intensive process of preparing a mousse cake with mirror glaze will take more than a day, but it will be spent waiting for correctly made puff components and not on the procedure itself. After all, it takes a day for the sponge cake to ripen; the glaze doesn’t “ripen” right away either, plus it’s time for freezing. But the end result is gastronomic perfection of an unusual shape with a perfectly varnished surface, delicious taste and the understanding that you were able to create this.
Ingredients
Despite the external variety, the internal component for a mousse cake with glaze consists of four basic elements:
- biscuit;
- mousse;
- filling or several fillings;
- finishing coating.
Each component of the cake is prepared separately. Only one cake layer is used as the basis of a confectionery masterpiece. Usually this is a classic sponge cake or vanilla. Less commonly, crumble (a pie or casserole with golden crumbly crumbs made from shortcrust pastry or muesli), streusel (confectionery pieces of dough of different sizes) or a sand base are used for the foundation.
A fluffy mousse crown will make a mousse cake with mirror glaze look voluminous. A fruit, creamy, chocolate or nut top covers almost 2/3 of the finished product. It is made from curd cheese, heavy cream or custard. But gelatin always remains an invariable element in the composition of a mousse cake, thanks to which the graceful, sweet cloud acquires a lot of priority qualities:
- ease;
- elasticity;
- the ability to maintain a given shape.
The next layer, which is under the mousse, is a mixture of nuts, various types of chocolate, custard or fruit and berry puree, flavored with gelatin. But you need to remember that the filling must be combined to taste with the mousse layer.
Food coloring is used to decorate mousse cakes with mirror glaze. But the classic option still remains a white surface.
To obtain a golden or silver hue, kandurin is used.
To make the mass look dense and at the same time translucent, titanium dioxide is introduced. The glossy structure can be repainted several times, additional portions can be added, and also stored in an airtight container in the refrigerator.
Experienced chefs, achieving maximum entertainment effect, cover the first base layer of the dessert with a second one. The result is a non-uniform colored surface with original inclusions and stains, the so-called.
- A prerequisite for applying glaze is that the dessert is well frozen. The dense structure will allow you to get a perfectly even coating.
- A frozen cake must be checked for the content of the smallest particles of ice by first ironing the product with your hand. Otherwise, the frozen water will drain along with the glaze.
- The glossy mass should not contain air bubbles. If this happens, it is recommended to pass it through a fine sieve. Punching through the glaze with a mixer, you need to form a perfect funnel. The electrical appliance must be held at an angle to avoid foaming.
- This is a capricious component regarding heating temperature. The working range when using dark chocolate is 35 degrees, with white the indicators are reduced and in the original it is 32 degrees. It is best to use a food thermometer.
- If water droplets appear on the finished product, you need to carefully get rid of them using a paper napkin.
- Try to cover the mousse cake with glaze in a circular motion, moving from the middle to the edges. Place the finished product on a wire rack and wait for the excess mass to drain. Under no circumstances should viscous threads be pulled or torn off. As a last resort, try to carefully wrap the excess under the bottom of the dessert with a wide knife blade. To be safe, you need to preheat it.
After reading the above quick guide, you can proceed with the step-by-step recipe for mousse cake with mirror glaze.
Stages of preparing mousse cake
As already mentioned, each layer is prepared separately. Then a culinary masterpiece is put together from disparate components. Moreover, a similar action is performed in reverse order.
- Place half a portion of mousse on the bottom of a silicone or springform mold, previously lined with parchment. Then put it in the refrigerator for 5-8 minutes so that the mass sets a little.
- After this time, the finished filling is evenly spread on the slightly frozen layer. It is then carefully covered with the rest of the mousse.
- The product is covered with a biscuit of slightly smaller diameter on top, and they try to “drown” it. After removing the excess, the mold is hidden under cling film. Store while the mousse cake is still unattractive in the refrigerator for up to 12 hours.
- Then, with the biscuit side down, it is placed on a wire rack. The final stage is decoration with mirror glaze.
The simplest way to prepare mirror glaze
To do this, it is necessary to maintain the exact dosage of each product using special measuring devices:
- 100 ml water;
- 100 g heavy cream;
- 60 g cocoa for color;
- 175 g sugar;
- sachet of gelatin weighing 12 g.
Preparation
- Pre-soak the gelatin. While we wait, combine sugar with water and heat the syrup over medium heat until the grains are completely dissolved.
- After the mixture boils, reduce the heat, stirring it, for another ten minutes. Add cocoa and cream to the thickened mixture. Thanks to them, the smell of hot chocolate begins to soar through the kitchen.
- Remove from the stove and add the ripened gelatin.
This is a budget option for coverage. However, the classic recipe for mirror glaze also includes glucose syrup or molasses, condensed milk, chocolate and vanilla:
- 120 g condensed milk;
- 12 g gelatin;
- 160 g sugar;
- 160 g white non-porous chocolate;
- 160 g glucose syrup;
- 80 ml water.
Mix sugar, glucose and water and place on low heat until the crystals are completely dissolved. In another container, melt chocolate in a water bath, add condensed milk.
Dissolve gelatin in water for 20 minutes. Then we put it in the microwave, bringing it to a liquid state. In this form, add to the sugar mass. We also add the chocolate mixture here. Beat the finished glaze with a blender until smooth. Let cool.
Biscuit
Let's look at the French recipe for making chocolate mousse cake with mirror glaze. Prepare the ingredients for the biscuit base:
- 100 g sugar;
- 4 eggs;
- 80 g flour;
- 20 g cocoa.
Whisk together the eggs and sugar into a fluffy foam. Mix cocoa and flour separately. Then, in several additions, add the resulting brown mixture to the beaten egg mass, constantly stirring from bottom to top.
Pour the finished dough into a mold lined with parchment paper. At 180 degrees, the biscuit takes about 40 minutes. Cool the resulting cake and cut it.
Let's start creating the mousse:
- 225 ml milk;
- 4 egg yolks;
- 40 g sugar;
- 10 g gelatin;
- 100 g chocolate bar;
- 300 g – 35% cream.
- Leave the gelatin filled with water to swell. At this time, grind the yolks separately with 20 g of sugar. Mix the rest of it with milk and put it on the fire, but do not boil, but wait for the crystals to completely dissolve.
- Stir the bulk of the resulting mixture constantly and add it to the ground yolks with sugar. In the container we see a fluffy egg cap.
- Then pour this foamed composition back into the saucepan with the remaining milk. Place over medium heat, stirring constantly, making sure nothing burns or curdles. Before our eyes, the milky-egg consistency begins to thicken, turning into a viscous component.
- Remove from the stove and let cool for a couple of minutes. Add chocolate and gelatin, mix thoroughly. A homogeneous brown mass appears to our eyes. Cool to room temperature, stirring with a whisk to prevent a dry crust from forming.
- We continue to work, now whipping the heavy cream, but slightly moderating the ardor so that it does not turn out to be butter. Add them in small portions to the cooled chocolate mixture, remembering to stir constantly. In the bowl we see the mass has almost doubled.
- After spending time in the oven, we get the same voluminous sponge cake. 180 degrees and half an hour did the trick. The thickness of the finished product should not exceed 1.5 cm. Therefore, we cut the brownies into two halves, one of which we freeze until better times.
Mousse
In recipes for chocolate mousse cake with mirror glaze, you can use several options for preparing the next layer. Let's get acquainted with one of them:
- chocolate of three different colors, 150 g each;
- butter 145 g;
- 450 g 33% whipping cream;
- a tablespoon of gelatin.
We divide each of the presented ingredients into three equal parts. First we work with dark chocolate, mixing it with butter and swollen gelatin. Beat the resulting mass, then do the same with the cream separately and combine everything.
The order in which color of sweet tile you work with first does not matter. The main thing is to do similar manipulations with light, dark and light brown chocolate. When assembled, the resulting composition will firmly settle on the sponge cake.
Berry secret – cherry confit with cognac
You want to blend the sweet chocolate taste of the brownie with sourness.
For this you will need:
- sugar 60 g;
- pitted cherries 250 g;
- sachet of gelatin 6 g;
- cognac 20 g;
- lemon juice 1 tsp.
Mix sugar with cherries and place on low heat until the crystals are completely dissolved. Cool the finished mass to 80 degrees and combine with the swollen gelatin. We also add a portion of cognac and lemon juice. Place the berry mixture first in a silicone mold, then in the refrigerator.
The rubberized container should be smaller in diameter than the mousse container. After all, the cherry secret should be well hidden under it.
Place it in the mold, strictly in the center on the slightly frozen part of the mousse. Cover with the rest of the portion.
Recipes for mousse cakes with mirror glaze amaze not only with their beauty and sophistication, but sometimes with their unusual composition.
Strawberry dessert with champagne
You can prepare a sponge cake using the previous method, maintaining the same proportions, but excluding cocoa. Instead, add 30 g of melted butter and ¼ part tsp to beaten eggs with sugar. vanilla extract, flour. Mix carefully and pour into the prepared pan.
For the mousse, pre-soak 10 g of gelatin and leave to swell for an hour. At this time, begin to beat 2 yolks. Set them aside and start mixing 15 ml of lemon juice, 250 ml of champagne and 100 g of granulated sugar. Heat the resulting composition over a fire until it thickens, then cool it.
Add the yolks here and put it on the gas again. Stirring carefully over low heat, make sure that the viscous consistency does not boil. The original should form a mass similar to jelly. Add gelatin and leave to cool.
Start whipping 200 ml of cream. Then gradually introduce them into the lemon mousse. We work with 2 proteins and 100 g of sugar, turning the ingredients into a fluffy foam. We send the white cloud into the general mass.
In the recipe for strawberry mousse cake with mirror glaze, it is recommended to additionally soak the sponge cake. To do this you need:
- 50 ml water;
- 50 ml champagne;
- 1 tbsp. l. lemon juice;
- 50 g sugar.
Mix water with sugar and place on low heat. Bring the syrup to a boil and continue cooking for another 4 minutes. The sweet mass should cool slightly. Then add champagne.
Let's start assembling the cake. First the soaked sponge cake, then the lemon mousse. We put all this in the refrigerator for a while.
The special feature of this dessert is the next layer – ripe strawberries. 250 g are cut in half and spread on a mousse surface. Jelly is poured on top:
- 400 ml champagne;
- 200 g sugar;
- pack of 15 g gelatin;
- 0.5 ml lemon juice.
We prepare gelatin in water. At the same time combine champagne, granulated sugar and lemon juice. Heat the composition until the crystals are completely dissolved. Add the prepared gelatin and cool. Cover the berry slices with a small portion of the jelly.
Place in the refrigerator for 30 minutes to allow the strawberries to firm up. Pour the remaining jelly over the dessert and return it to cool for 4 hours. The cake is ready.
Preparing a mousse cake with mirror glaze at home should initially be done in tandem with an electronic scale. Precisely verified ingredients are the guarantee that your efforts will not be in vain.
You can store gastronomic perfection in the refrigerator for 2-3 days.
As you can see, preparing a mousse cake with mirror glaze, guided by the above material, is not so difficult. You can master culinary science on your own only through trial and error.
Prepare the ingredients.
Soak leaf gelatin (8 g) in a bowl with plenty of very cold water for 5-10 minutes.
Advice. If you are using powdered rather than sheet gelatin, then 8 g of powdered gelatin should be poured into 48 g of water and left to swell for 40-60 minutes.
Place chopped white chocolate (100 g) and condensed milk (70 g) into a bowl or tall plastic measuring cup. Set aside.

Pour sugar (100 g) into a small ladle or pan, put glucose syrup (100 g) and pour water (50 g).

Bring water with sugar and glucose to a boil and cook to 103°C (if you don’t have a thermometer, let the syrup boil for about 2 minutes).
Pour the hot syrup over the chocolate with condensed milk and leave for 2 minutes.

Add squeezed sheet (or swollen powder) gelatin to the chocolate.

Add food coloring.
Advice. You can use powdered or gel food coloring to make the glaze. If the coloring is gel or powder (fat-soluble), then add it to the icing before punching it with a blender (as shown in my photo - I use fat-soluble powder coloring). Powdered fat-soluble dyes color the glaze in brighter colors (compared to other dyes).
If the glaze is water-soluble, add it to the syrup. Also, the color and saturation of the finished glaze will depend on the quality of the dyes.
To obtain a white glaze, add white dye (titanium dioxide), because glaze without adding dye will have a yellowish milky tint and will not turn out pure white.

Using an immersion blender, beat the glaze, being careful not to form bubbles in the glaze.
Advice. We punch the glaze with a blender, turning the chocolate with the rest of the ingredients into a homogeneous emulsion, which makes the glaze smoother and shiny. But there are subtleties that need to be taken into account.
Fresh, just-prepared frosting tends to produce a lot of bubbles, which are created when the blender is not positioned correctly. Therefore, carefully immerse the blender in the glaze at an angle of 45°C. The blender should be completely immersed in the glaze, but not at the bottom of the measuring cup, but close to the surface. You need to try to find such a position of the blender when, during the process of punching, a pattern in the form of a triangle is formed on the surface of the glaze, which can be called differently - a kind of small funnel that sucks in the incoming air and the rare air bubbles that form. Also, listen to the sound that the blender makes - over time, you will learn to navigate by the sound whether the blender is correctly immersed in the glaze. Punch through the glaze at the slowest speed of the blender - this is also an indispensable condition for bubble-free glaze.

Cover the finished glaze with cling film so that the film adheres to the surface.

Place in the refrigerator for 12-24 hours to stabilize - during this time it will thicken and when pressing on the surface of the thickened glaze you should feel some resistance, i.e. The glaze should not be liquid, but elastic.
Before coating the product, the glaze must be brought to a working temperature of 30-35°C by heating it in the microwave or in a water bath. We check the temperature using a culinary thermometer.
The glaze is applied to a completely frozen product: before applying the glaze, we check its temperature again and pour the product with quick and confident movements, with a fairly strong stream, directly from the spout of a measuring cup (this is why such a measuring cup is convenient for preparing glaze).
- Gelatin - 12 g
- Glucose (or invert) syrup - 150 g
- Water - 75 g
- Sugar - 150 g
- Chocolate - 150 g
- Condensed milk - 100 g
- Dye
Close Printing ingredients
Mirror glaze- the best recipe in RuNet, a recipe that is guaranteed to work!
Mirror glaze- an impressive glossy coating for modern cakes and pastries. It is most often used in mousse desserts, but sometimes it is also used to cover traditional cakes, although in this case, as a rule, not completely, but only the top, so that the glaze drips down in beautiful drips.
excited my mind for quite a long time until I learned how to make it :) I always imagined that these amazing cakes were nothing more than photoshop! Well, an edible surface can’t be so polished, so reflective, so perfect, I thought! It turns out it can! And most importantly, this recipe turned out right the first time!
The simplest ingredients are used for its preparation. But you can’t do without a culinary thermometer: the glaze has a so-called working temperature at which it is poured onto a cake or pastries. This temperature is 30-35 degrees, on average 32. And it is very important to observe it, because plus a few degrees - and the icing will drain too much, leaving gaps, and minus - it will set before it has time to cover the cake. And since icing is the final stage in making a cake, it can easily negate all previous efforts. If you ignore the rules, of course. And the temperature of the cake itself is also very important: it must be well frozen and you need to take it out of the freezer immediately before pouring the icing.
IMPORTANT: if the glaze is used for drips on the cake, its temperature should be lower, in my experience, no more than 30, about 28 degrees. Otherwise, the drips will reach the very bottom of the cake and puddles will form on the base. It doesn't look very good.
Well, here is the recipe! Step by step with photos.
To prepare colored mirror glaze, we will need:
- gelatin (I'll show you how to use powdered gelatin, but you can also use sheet gelatin),
- glucose syrup - don’t be alarmed, it can be easily replaced with molasses or liquid honey, but in the latter case the honey aroma and taste will be felt,
- White chocolate,
- condensed milk,
- sugar,
- and dye.
The products, as you can see, are affordable, and everything except the dye can be bought at any supermarket. Dyes are sold in specialized stores for confectioners. I will be using Americolor gel coloring in this recipe. It is high quality and economical. You can also use powdered fat-soluble food coloring. If you need a snow-white glaze, titanium dioxide will help (looks exactly like tooth powder :)). Natural dyes a la beet juice or spinach juice are not suitable for mirror glaze, and if you don’t have any dye, there is only one way out: try making a glaze simply based on dark chocolate. And recently I discovered a recipe for myself, depending on the berries, it can also turn out bright, but that’s a completely different story.

So, we seem to have decided on the ingredients. Go!
Pour 12 g of gelatin into 60 g of cold water.

Put 150 g of sugar in a saucepan, fill it with 75 g of water and 150 g. This whole thing looks amazing! :)

We put it on fire.

Bring to a boil and the sugar is completely dissolved.

Melt 150 g of chocolate in a water bath or in the microwave. It is important not to overheat, otherwise the chocolate will curdle and be spoiled. Construct the water bath so that the boiling water does not touch the bottom of the saucepan with chocolate. In general, immediately after boiling, it is better to turn off the heat and, constantly stirring the chocolate pieces, wait until they have completely melted. If you use a microwave, place the container with chocolate in it for 15 seconds, take it out, stir, reheat, etc., until all the chocolate has melted.

Pour the chocolate into a tall blender glass. In principle, the glaze can be made without a blender and, accordingly, a glass from it, but with them it is faster and more convenient.

Pour 100 g of condensed milk onto the chocolate. Needless to say that milk must be of high quality? Its taste directly affects the taste of the finished glaze, so it is advisable to take condensed milk without vegetable components. The real one is the one with only milk and sugar.

Pour hot invert syrup onto the chocolate-condensed milk mixture.

This is how something turns out. Future beauty, by the way! :)

We are trying to mix. This will be difficult.

Pour in the dissolved gelatin in a thin stream and mix. Like chocolate, it is important not to overheat gelatin: at temperatures above 70 degrees, it loses its gelling properties.

Add dye. In the case of gel, a few drops are enough.

And again we try to mix. The photo shows that the mass does not want to become perfectly smooth and uniform, as it should be! There are, of course, craftsmen who can make do with a spoon...

... but that's not me :) So let the blender help me! You should hold it at an angle of 45 degrees and try not to lift it above the surface of the glaze to avoid the appearance of bubbles.

However, no matter how hard I try, they still always form. Look at them, they hatched.

But I know how to fix it - pass the glaze through a fine sieve!

Actually, our colored mirror glaze ready!
The glaze from this amount of products is enough to cover a mousse cake with a diameter of 20 cm. For drips, this amount is a lot; for an average cake, in my opinion, a third will be enough. But this is a matter of skill and taste.
The glaze can be prepared several days in advance and put in the refrigerator, and before use, heat it in a water bath or in the microwave (15 seconds at a time, stir, and again in the microwave), bring to the desired temperature and work!
Of course, this is not the only recipe for colored mirror glaze, but it seems to be the most common.
Prepare, try, share the results!
The mirror glaze, like many other things, was inspired by the wonderful Olya, I never tire of thanking her! :)
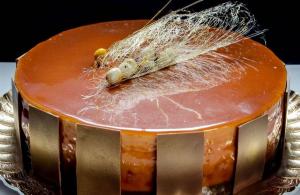
Pastry chef Victoria Tkachenko at the Food-Everywhere culinary school showed a master class on creating an original Coffe-banana sponge cake with a mirror glaze - gloss. This cake with the night sky and stars is perfect for a festive table at Christmas.
First, prepare the biscuit cakes. To create a sponge cake you need 5 eggs, 170 grams of sugar, 10 grams of baking powder when using cocoa, 3 tablespoons of odorless sunflower oil, 140 grams of flour, 20 grams of cocoa.
Separate the whites from the yolks and beat until strong foam. Add sugar in three additions. Beat until a thick white meringue forms. Then stir in the yolks and sunflower oil with a spatula. Sift flour with cocoa and baking powder in three additions. Bake on the “top-bottom” mode at a temperature of 180 C° for about 30-35 minutes. Remove the cake from the oven, let cool for 20 minutes, then turn it over and cut it into thirds.
The cake consists of several fillings - coffee mousse at the bottom, then banana compote in dry caramel, cream cheese on top, and a glaze on top.
For coffee mousse you need 110 grams of milk, 5 grams of coffee beans, 100 grams of white chocolate, 12 grams of gelatin, whip 100 grams of cold cream 33% fat.
Boil milk with coffee and chocolate. Soak the gelatin until it swells. Whip the cream. Dissolve gelatin in a mixture of milk, coffee and chocolate and let cool. Fold the mixture into the cream with a spatula. Place in the refrigerator for 2 hours.
You can soak the cakes with chocolate mousse.
In the photo: the first cake is covered with coffee mousse
For banana compote you need 200 grams of banana, 150 grams of cane sugar, vanilla, 100 grams of cream 33% fat. First you need to melt the sugar to a caramel state. Boil the cream. Mash the banana. Carefully pour the cream into the caramel, stirring. Add banana and vanilla. Then put everything in the freezer for 2 hours.
In the photo: banana compote in dry caramel is laid out in a second layer
For glaze you need 75 grams of water, 150 grams of glucose syrup, 150 grams of sugar, 100 grams of condensed milk, 15 grams of gelatin, 110 grams of white chocolate.
Pour gelatin with water to swell. In a saucepan, heat 100 grams of water, sugar and glucose syrup to 103°C, wait for the foam at the top and cool slightly so as not to burn the chocolate.
Pour in condensed milk and swollen gelatin melted in the microwave. Add white chocolate and coloring, use a blender to make an emulsion, being careful not to add air so that there are no bubbles in the glaze. Cool the mixture to room temperature. If you are planning a combination of several colors, before adding the dye, divide the mixture into the required number of parts. Place in the refrigerator overnight.
Cream cheese is placed on top of the cake. For cream cheese you need 320 grams of curd or cream cheese Violent or Hohland Cremette, 180 grams of butter, 100 grams of powdered sugar.
Beat soft butter, add powdered sugar, beat until white. Add the cheese in three additions, without beating too much.
In the photo: cream cheese is spread over the cake under the glaze
In the photo: the surface of the cake is leveled using special devices.
Before covering the cake with glaze, you need to lift it onto a stand using spatulas.
For dark glaze you need 94 grams of cocoa, 98 grams of water, 277 grams of sugar, 189 grams of cream, 11 grams of gelatin. Boil sugar and water to 105°C, add cocoa. Separately, boil the cream and pour into the syrup. Set aside to 60°C and add gelatin. Punch with a blender. Work with glaze when it is heated to 48-50°C.
Before coating, melt the glaze to 45°C, its working temperature is about 38°C. Glaze should only be applied to a frozen cake. The first dark glaze is poured evenly onto the cake from the jar, the second light glaze is distributed using a knife dipped in water.
To create golden spots, you need to take three parts decor gel and one part water, heat to 70°C. Then drip onto the surface of the cake in the right places.
The drawing is completed with the help of white stripes, which are made with the narrow tip of a syringe, moving your hand in a sweeping manner and going beyond the surface of the cake.
After the drawing is ready, excess gloss is removed from below. The cake is then transferred from the high stand using spatulas to a permanent base.
Pastry chef Victoria Tkachenko teaches the art of preparing various cakes and sweets at the Food-Everywhere culinary school. Tkachenko follows fashion trends in preparing and decorating cakes. Her lessons will teach you how to create beautiful and tasty sweets that can be prepared for loved ones and for sale.
In the photo: participants of the master class with certificates
Leonid Galin